


Setup A New Account - Microsoft Outlook 2007

Open Microsoft Outlook 2007.
At the top of the page click on the 'Tools' menu and then select 'Account Settings...'. Tools > Account Settings... | ||||||||||
 Auto Account Setup Check the box at the bottom for 'Manually configure server settings or additional server types'. Note: at this point, depending on whether the user has setup a previous account in Outlook, the next couple screens may very in order but they are nearly identical, just confirm with the user which menu they are viewing. | ||||||||||
 The key point is that they check the box to 'Manually configure server settings or additional server types' and select the type of email service for the account (POP/IMAP).
They will see either the 'Choose Email Service' (POP, IMAP, HTTP) or the user's settings window with 'Manually configure server settings or additional server types'. The key point is that they check the box to 'Manually configure server settings or additional server types' and select the type of email service for the account (POP/IMAP).
They will see either the 'Choose Email Service' (POP, IMAP, HTTP) or the user's settings window with 'Manually configure server settings or additional server types'. |
|
|||||||||

Choose E-mail Service
Choose the E-mail Service: Put a dot in 'Internet Email' (or in 'Microsoft Exchange, POP3, IMAP, or HTTP' depending on the screen user is viewing). Make sure that your settings look like the settings shown in this screenshot. The following are the most important:
|
|
|||||||||

|
|
|||||||||
 Internet E-mail Settings Click the 'Outgoing Server' tab at the top of the screen. |
|
|||||||||
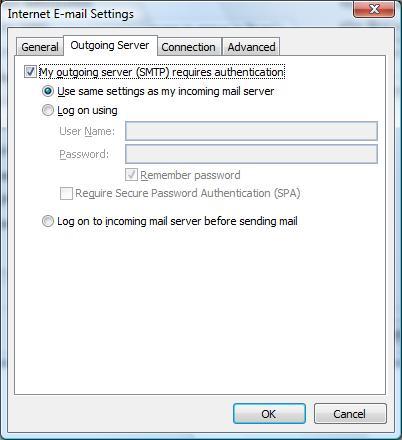
Outgoing Server
Put a checkmark in 'My outgoing server (SMTP) requires authentication' and make sure that the dot is in 'Use same settings as my incoming mail server'. |
|
|||||||||

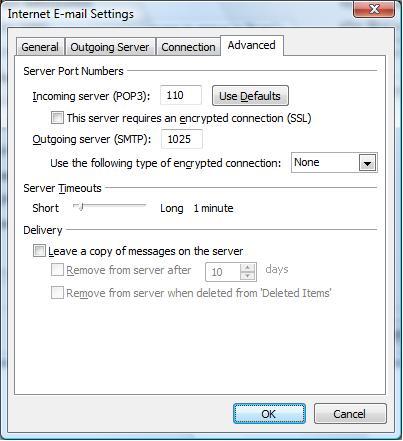
Advanced
Click on the 'Advanced' tab at the top. Make sure that your settings look like the settings shown in this screenshot. |
|
|||||||||
|
|
|||||||||
 |


